How to Treat and Prevent Blisters
By Kristann Heinz,
M.D., RKC
I, like many of you, pride myself on my strong hands. Mine are nicely calloused from hours of farm chores and, of course, from my KB training. But, alas, even the most conscientious KB athlete faces a blister from time to time.
What is a blister? A blister is a bubble under the skin that can be filled with a clear liquid, pus or blood. Friction blisters can form when the skin is repeatedly rubbed in one spot. We see this with improperly fitting shoes or a KB rubbing on the palm of our hand. A blood blister is seen when the skin has been pinched or undergone a traumatic insult such as catching it between two KBs. The area around the blister may be red and tender. In general, with proper care a blister should heal within 3 to 5 days.
Step-by-Step Blister Care
- When you first detect a blister, stop your activity. Do not break or “pop” the blister. The skin that covers the blister helps to protect it from infection.
- Gently wash with soap or clean with Betadine if you are not near a sink. If the blister is broken make sure to wash the area as above. If the blister came from KB training, it is important to clean the blister of any paint or medal filings that may have imbedded themselves in the blister area.
- Next, apply antibiotic ointment such as Neosporin or Bacitracin to the area.
- You can protect your blister by making a blister doughnut. Cut some moleskin to the appropriate size for the blister area. [You can buy moleskin at a drugstore.] Then cut out a circle from the center of the moleskin that is slightly larger than the blister area. Place the ring or doughnut around the blister.
- Cover the blister area with gauze and secure with hypoallergenic tape. This should reduce the friction that is applied to the area. Change the blister dressing daily.
- Monitor healing to ensure recovery. If you find the blister area is increasingly red, swollen and painful or you notice pus, your blister may be infected. You may also have a fever. Your blister needs to be looked at by medical professional and they may need to give you antibiotics for a skin infection or cellulitis.
Calluses are the build-up of hard skin caused by the uneven distribution of weight. I often get calluses at the base of my index, middle and ring finger on my palm from KB training. If calluses are not properly cared for, they to can be torn off and leave one with an open sore like a broken blister. If you have a torn calluses follow the care instructions for a broken blister. To prevent torn calluses, do not let the calluses get too big. After a shower or bath, carefully use a pumice stone or emery board to gently remove excess build-up of tissue.
Blister Prevention is the Best Prescription
- If you know you have a tendency to get blisters in a certain spot, cover it with hypoallergenic medical tape prior to the activity.
- You can also wear cotton fingerless gloves on your hands to prevent blister formation. We buy cotton gloves from the hardware store and cut off the fingers.
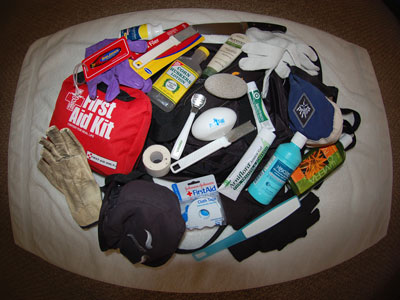
- Keep a first aid kit handy with the appropriate medical supplies to care for a blister. I suggest Betadine or hydrogen peroxide, moleskin, antibiotic ointment, gauze, hypoallergenic medical tape and scissors.
As the weather gets cooler, our skin gets drier. Hand care is essential to your training. Reducing friction is key. Shave your calluses. Take the top few layers off, but do not shave the entire callus away. Pumice stones, pedeggs and callus shavers work well. Follow up with hand lotion.
No one wants to see blood on your hands after you finish a round of pull-ups let alone have to use that bar afterwards. Additionally, question your chalk use prior to high rep pull-ups or kettlebell swings/snatches. Kettlebell chalk is typically reserved for Girevoy sport and usually unnecessary for the hardstyle tempo that we practice. Unless you know how to properly chalk the KB handle (which we won’t let you do), chalk is good for the first few reps and then it rapidly starts drying your hands creating friction. We are more impressed with those that walk away with their hands intact than those that have to stop the workout because of a torn callus or blood blister. Take care of your hands to stay in the game!
These tools should be in your bag that you bring to the gym every time you come. Additionally, you are required to wear knee highs or pants/leggings on deadlift day. Keep a pair of long socks in your gym bag so you are always prepared.
Warmup
Run to Sessions St. 2x
3 Sets
10 Kettlebell Swings
10 Halos
10 Cossacks
Skill
15 minutes
Speed Ladder
Lateral Movement Drills
Work on swinging your arms from the shoulder, staying on the balls of your feet, head up, quick and accurate footwork, and a sharp turn and explosive burst as you exit the ladder.
Conditioning
15 Minutes AMRAP
20 Yard Burpee Broad Jump
10 Double Kettlebell Clean and Press (2x20k/2x14k)


